How to generate a PDF from Google form response
Form Notifications provides you with the ability to generate a PDF file containing all the answers of a Google Form submission response.The generated PDF is sent as file attachments along with the notification emails.
How to Enable PDF Attachment
Select the Field:
If you desire a PDF attachment of all the form answers, simply select the "Attach PDF with Email" field while creating or editing a Processor in the add-on.
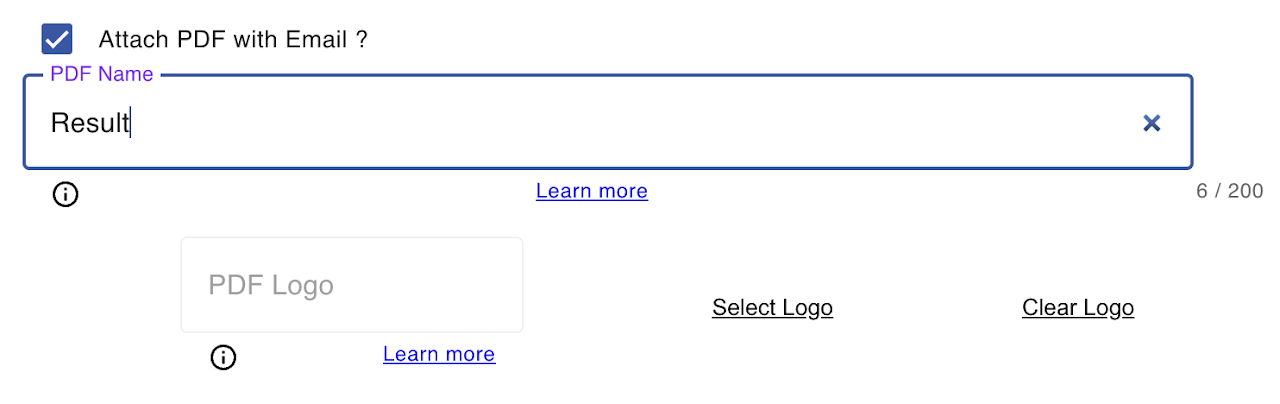
Choose a File Name:
You have the flexibility to choose a name for your PDF file. Use static and dynamic expressions to dynamically determine the file name. For instance, employing {{Form Name}} as the PDF file name will result in the attached PDF file using your form name.
Include Your Brand Logo
Logo Placement:
Display your brand logo at the top of the attached PDF to add a professional touch. If you have a logo in your Google Drive, you can seamlessly integrate it into the generated PDF.
Select Logo from Google Drive:
Once you opt for PDF attachment, you'll find an option to select a logo directly from your Google Drive. The chosen logo will be positioned at the top of the generated PDF, offering a branded and polished appearance.
Enhance Communication and Presentation
Attaching a PDF with all responses, complete with your brand logo, enhances the presentation and professionalism of your email notifications. It streamlines information sharing and provides a comprehensive overview of form submissions.
Customize PDF Content
By default the PDF file contains the out put of the expression {{ Only Answers }} in a HTML format.If you want to customize this and have your own html ,you can provide the custom HTML inside the text area of "PDF Template Content".
If you are not comfortable with writing HTML you can leverage Chat GPT or Gemini AI to generate your HTML and test them using various online HTML editors.
Let's look at an example .
Assume you have a google form with three questions "Name" , "Age" , and "Address" . Rather than using predefined default table you want to have your own content . I used one of the AI tolls to generate the following HTML that Iused directly inside "PDF Template Content" area .
<div style="font-family: Arial, sans-serif; background-color: #f2f2f2; margin: 0; padding: 0;">
    <div style="max-width: 600px; margin: 0 auto; padding: 20px;">
        <div style="text-align: center;">

        <div style="margin-top: 20px;">
            <p style="text-align: center;">Lorem ipsum dolor sit amet, consectetur adipiscing elit. Phasellus eget justo vitae leo vehicula consequat.</p>
        </div>

        <div style="margin-top: 20px; background-color: #fff; border-radius: 5px; overflow: hidden;">
            <table style="width: 100%; border-collapse: collapse;">
                <caption style="padding: 10px; background-color: #f2f2f2; font-weight: bold; text-align: center;">Table Title</caption>
                <thead>
                    <tr style="background-color: #f2f2f2;">
                        <th style="padding: 10px; text-align: left;">Question</th>
                        <th style="padding: 10px; text-align: left;">Answer</th>
                    </tr>
                </thead>
                <tbody>
                    <tr style="background-color: #f9f9f9;">
                        <td style="padding: 10px;">Name</td>
                        <td style="padding: 10px;">{{ Name }}</td>
                    </tr>
                    <tr>
                        <td style="padding: 10px;">Age</td>
                        <td style="padding: 10px;">{{ Age }}</td>
                    </tr>
                    <tr style="background-color: #f9f9f9;">
                        <td style="padding: 10px;">Address</td>
                        <td style="padding: 10px;">{{Address}}</td>
                    </tr>
                </tbody>
            </table>
        </div>

        <div style="margin-top: 20px;">
            <p style="text-align: center;">Footer Content</p>
        </div>
    </div>
</div>
- Be careful, all the HTML syntaxes may not work .
- If you include a URL to embed an image it wont work.
- You may include an alternate DATA url format for image.
- Keep the Html content small otherwise your performance may be impacted.
- Test the final HTML content before sending it to users. :::